Showing posts with label Valentine's Day. Show all posts

Friday, February 12, 2010

Valentine S'mores Teacher Gifts

I had fun making up some little Valentine S'mores treat bags to give my sons' teachers as gifts for Valentine's Day. The printable tags are from Tricia Rennea. I saw them featured on another blog and that is what gave me the idea to make them. I hadn't made marshmallows from scratch for a while so I used THIS RECIPE from Family Fun and made little heart shaped vanilla marshmallows. I dipped them in red sugar and I think they turned out pretty cute. I am sure that marshmallows are easier to make if you have a stand mixer (they have to be mixed for 12 minutes), but I only have a hand mixer and was able to make them without falling over from exhaustion. So don't be deterred from trying this even if you only have a little-ol' hand held like me. Someday I hope to graduate to a "big-girl" mixer, but they are quite pricey, so it may be a while before that happens. I guess I should have registered for one for my wedding.......17 years ago. Anyway............these were fun to make. You could probably still whip some up to give this year, or bookmark the idea for next year. Everyone who received these thought they were very cute. (And obviously, you could do it without making the marshmallows from scratch. Sometimes I just get a "Martha" moment and have to go all out.) :-)


I packaged the marshmallows in a separate treat bag and closed the top with some pink and red paperclips that I had in my stash.


Thursday, February 11, 2010

Kiss Kiss Hug

This project has been all over the blogosphere and I don't even remember where I first saw it. Anyway, yesterday I quickly whipped up this little XXO display for my baker's rack. I don't have a lot of Valentine's decor and thought these would be quick and easy to make. I think I would like these a little better if the frames were white, but it is WAY too cold here in the midwest to spray paint right now. Besides, the Target Dollar Spot has a set of 3 little square silver frames for $2.50. Can't beat that! (Well, actually you COULD beat that at a garage sale or the right thrift store......) I just removed the little papers in the frames and replaced them with scrapbook paper in Valentine colors. I wanted to take out the glass, but it was not removable. So........I just glued the glass marble chips (found at a garage sale this summer) right on top of the glass. I used Elmer's white glue and it worked fine. You could do this for almost any season. I've seen many variations on different blogs. I literally did these while talking to Amber on the phone. They were so easy.


Wednesday, February 10, 2010

More vehicle valentines

If you read my last post, you already know that my little boy made race car valentines to pass out at school. This weekend I helped my oldest boy make some candy airplane valentines for his class. I used a printable banner from Giver's Log and tied it to the end of the airplane. He signed his name on the back. For the airplanes, you use Smarties candy for the body, a piece of gum for the wings and Lifesaver's candy for the wheels. Everything is held together with a rubber band. CLICK HERE for the instructions from Family Fun.


Monday, February 1, 2010

VRRROOOM!!! Valentine Race Car cards

This afternoon my little boy and I made his valentines for his preschool valentine exchange next week. I LOVE to make valentines "from scratch" instead of buying them in a box. Don't get me wrong.........I've definitely bought boxed valentines in the past and no children were harmed by it. However, if I have the time and a great idea ("borrowed from another creative person. of course) I love to make homemade ones. A great resource for ideas is Family Fun.....both the magazine and the website. For my race car-lovin' boy, I found THIS IDEA and thought it was perfect. I decided to skip the (very expensive and hard-to-find) chocolate cars...........although they are very cute.............and used some great little race car stickers that I found at a card outlet store. We picked out a little truck from our HUGE stash of toy cars and rolled the wheels in black paint. Then my son rolled the truck back and forth across a piece of red cardstock. He was so proud of himself and kept saying, "I can do this all by myself, Mommy. You don't need to help me." Which was true. I put a piece of waxed paper under the cardstock and he was totally independent.


I used some large (2X3 inch) white shipping labels to print out the message, "You make my heart race!!" I printed 2 messages per label, then cut the labels in half and used my scrapbooking corner rounder to round the cut corners. On the back we attached a little return address label that I had printed with "Happy Valentine's Day!" and my son wrote his name on the back of all the cards. They turned out so cute and I know he will be proud to share them with his friends.


Saturday, January 30, 2010

Valentine Pillows

Today DH, my little boy, and I went to Hobby Lobby. Oh, how I LOVE that store!! My big boy was spending a little time with Grandma and Grandpa. Anyway, I needed to pick up some things for school for next week and they tagged along. I also wanted to get some Valentine fabric to make some pillows for my boys. I settled for the print I bought because there was literally no other choice. It's pretty cute, I guess, but I would have appreciated a better selection. Anyway, I'd seen the idea for making Valentine pillows in THIS POST on How Does She? (which is a great blog with great ideas that I discovered recently). For some reason I decided to make my pillows round. I had bought some really wide rick-rack to trim them with. I am not totally pleased with how they turned out, but my boys love them already. And that's what's important, after all. I used some sparkly felt to make a heart-shaped pocket on the front of each pillow. The top of the heart is open so that each day in February up until Valentine's Day I can tuck a little "love" note into the pocket for each boy. Hopefully, DH will write notes to them too. I know my oldest son, especially, will treasure these little love notes because he is always very touched when we write special things to him.


Here's a close-up of the pocket on the front. I added the small pink heart in the middle for an accent. I had originally sewn it on using a straight stitch but was really unhappy with how that looked. I like the loose zig-zag much better.


The "love" pillow below is another in my series of freezer-paper stencilled burlap holiday pillows. I painted the "love" on the burlap ages ago and just had to sew and stuff it which I finally did tonight. It took MANY coats of white paint to make the word look really white on the red burlap. If you are planning to freezer-paper stencil on burlap, remember to place some waxed paper underneath because the paint really bleeds through. I found that out after I accidently printed the word "believe" on my ironing board cover. Like DH said, though, it's not a bad word to ponder while you are ironing. He irons WAY more than I do. I try to buy clothes that don't have to be ironed. In fact, I only iron when doing sewing projects. Anyway, I digress. I added a little heart pocket on the back of this pillow so I can write love notes to DH in February. AWWWWWWWWW...............how sweet is that? Maybe if I'm lucky he'll write a note or two back to me. (hint hint)


Here's the pocket on the back.
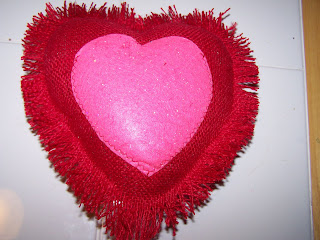


FYI: For the heart shapes I used patterns printed from Preschool Express. If you click on the left sidebar on "Pattern Station" you will find printable shapes for all sorts of occasions. I often find patterns there that I can use for school.