Here is what the back of my van looked like at 1:00 p.m. when I started the project. It took me about 30 minutes (and some muscle power) just to haul everything to the backyard. DH would have helped but he is out of town this weekend.

Once everything was moved to the backyard it was time to make my "Mel's mix". This is a mixture of roughly 1/3 peat moss, 1/3 compost, and 1/3 vermiculite. It is the combination recommended by Mel Bartholomew, the creator of the SFG gardening method. The great thing about starting with Mel's mix is that you don't need to worry about the condition of your soil.....you don't use your soil. Also, the combination is specially designed to hold just the right amount of water to make your plants grow really well. With this combination it is impossible to overwater your plants. If you want to know more, head over to Mel's website or check out his book from your local library. I have it checked out right now for the second time.

Here are my beds waiting to be filled with Mel's mix.

To mix the Mel's mix I got a big tarp and poured out all the ingredients on top. In the book Mel recommends starting with the compost, then adding the peat moss, then the vermiculite. The main reason he recommends this is because he strongly suggests finding several different types of compost and mixing them together first. I could only find a bagged mixture of humus (plant matter) and manure so I didn't need to mix compost. After mixing everything up this afternoon I have a few suggestions if you are going to try to do this yourself. First........if you are mixing material to fill several beds, only mix the amount needed for one bed at a time. I started by mixing about half of my whole batch (which means half of 12 bags of compost, 5 bales of peat moss and 2 HUGE bags of vermiculite) the first time and this ended up being pretty difficult to mix well. It was just too heavy. After that I only mixed one "bed's" worth at a time and that was much easier. Second, if you don't have to mix different types of compost I found it easiest to pour out the peat moss first, then mix the vermiculite into that. I ended up mixing these with my hands because it felt so good and worked better than doing it any other way. I was literally up to my elbows in mix. My sons helped with this part. It was fun to get so dirty. If you have another adult helping you Mel recommends folding the tarp and mixing it that way. I only had an 8 year old and a 4 year old so we used hands. After mixing the peat and vermiculite, add the compost. It tends to be the most damp and heavy so it was much better to mix it in last.

Here is what the mixture looks like before being mixed together.

And here is what it looked like after.

I lined the bottom of the bed with some landscape cloth I found in my garage and several layers of newspapers since I didn't have enough cloth to cover all the beds. Hopefully the newspaper will be enough to deter weed growth. A major reason I am doing this method is because I HATE weeding. As Mel says in the book, there is little to no weeding with this method. Because you are not using soil there are no weed seeds in the mixture. Any weeds that do pop up are easily pulled out because the mixture is so loose, unlike your yard which is compacted making it difficult to pull out weeds.

My big boy took a photo of me spreading out the mix in one of the beds. In the background you can see the corner of our chicken yard, one side of our boys' fort, and our two compost piles (in the white circular "fence".

It was a good feeling to get all the beds filled without getting rained on. It was cloudy all afternoon and at one point it seemed like it would rain, but it didn't.


It feels good to have these done. Hopefully I will have enough energy to start planting tomorrow. I am really tired tonight!


It was a good feeling to get all the beds filled without getting rained on. It was cloudy all afternoon and at one point it seemed like it would rain, but it didn't.

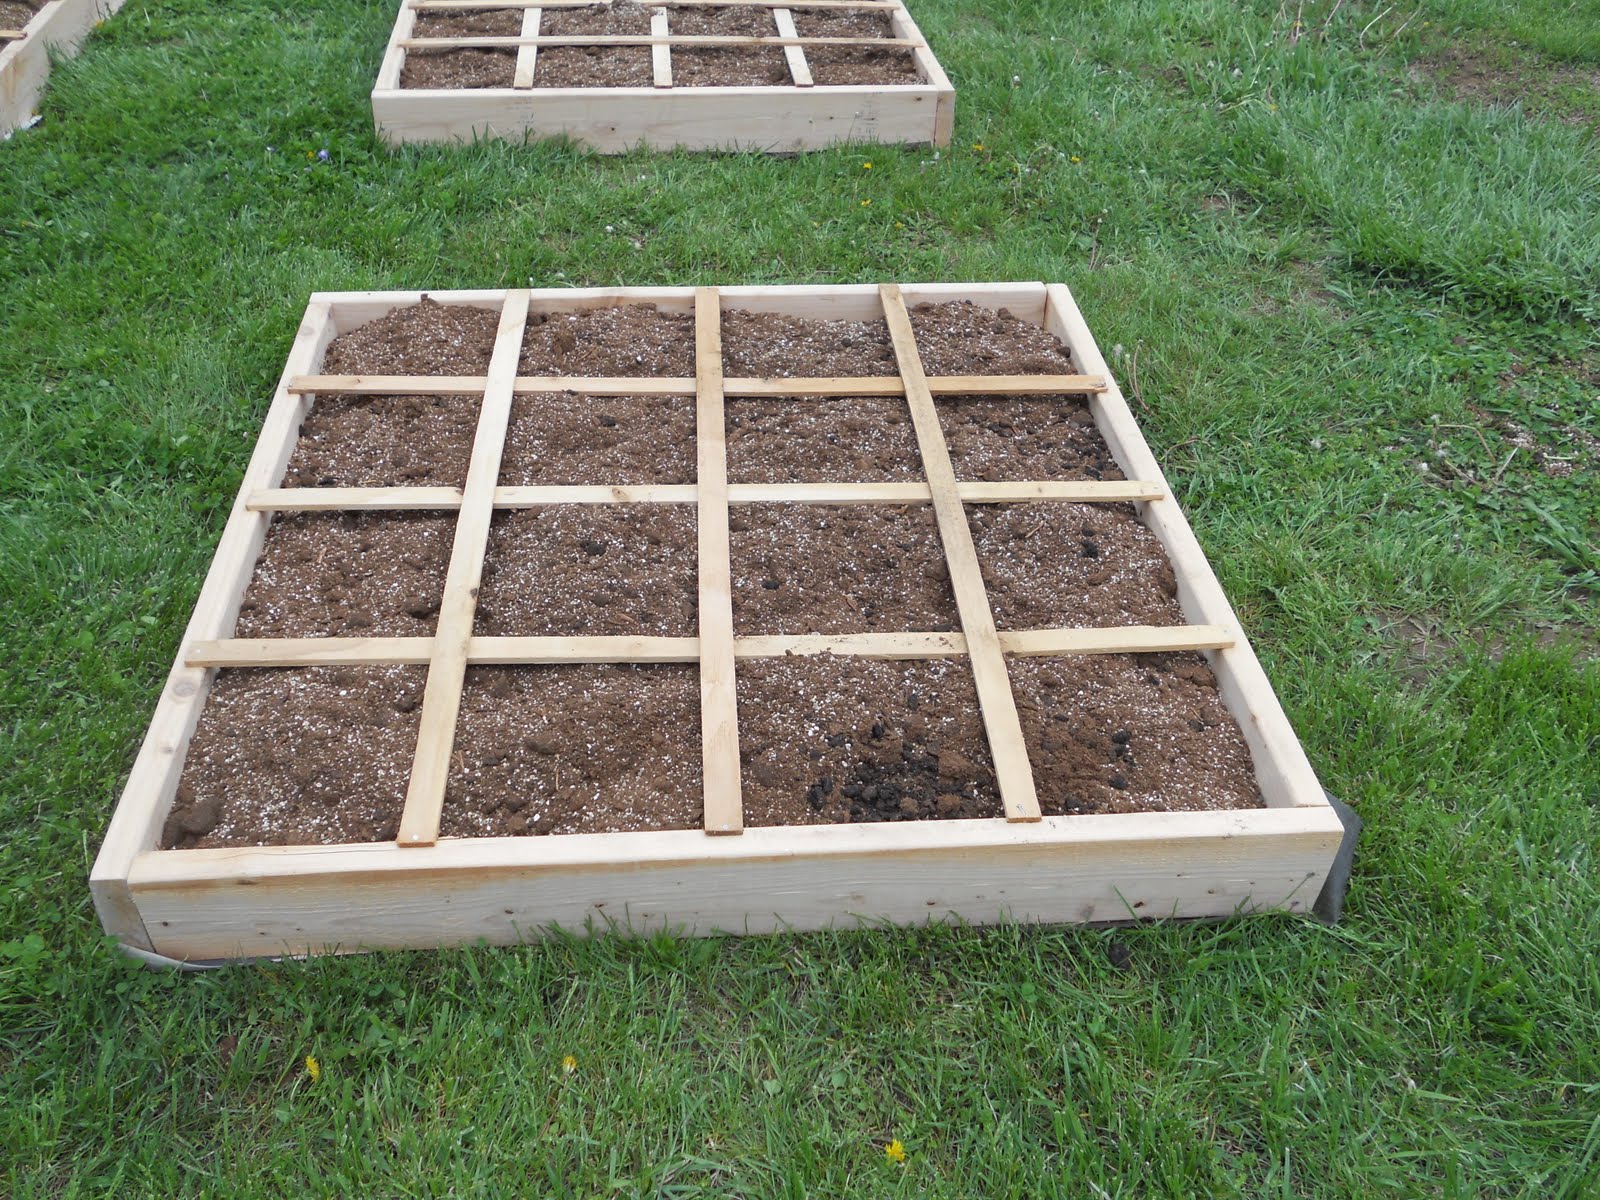
The final step was to nail pieces of wood lath into a grid shape on top of each bed. Mel insists that without the grid you don't have a square foot garden. He says it is important to add the grid so you can truly see where you need to plant everything. In theory, each square foot could have a different vegetable or flower in it.

It feels good to have these done. Hopefully I will have enough energy to start planting tomorrow. I am really tired tonight!


8 comments:
Want to come over and make me some? Please!!!
Jody
http://mommymoment.ca
You'll love your SFG...WE sure love ours! My only complaint was that it was almost TOO easy! We set up a third bed this weekend...looking forward to more great gardening this year!
Very nice! I've used sqf for about 3 years and it's great. I don't practice all of the principles (for instance my beds aren't raised) and it's still been very easy. Good luck with your gardening.
Very nice! I've used sqf for about 3 years and it's great. I don't practice all of the principles (for instance my beds aren't raised) and it's still been very easy. Good luck with your gardening.
I bet you are exhausted!! Gardening is satisfying, though. GOOD FOR YOU!!!!
And did you leave room for the lawn mower to go between the boxes? :o)
Laura, how is the SFG going? We just put in a fourth box a few weeks ago, our first deep box, 12 inches, and we planted more tomatoes and carrots!
Laura, your gardens look AMAZING! I hope your gardening is going well and your plants are growing quickly. I wanted to stop in and see how everything is going. You haven't posted in a bit (I usually follow your Montessori ideas/blog), but I've been thinking about you. I hope everything is okay and you're just out enjoying your family and your summer. Thanks again for always sharing such great ideas/activities.
Post a Comment