Saturday, April 24, 2010

SFG Day is here!! Yippee!!

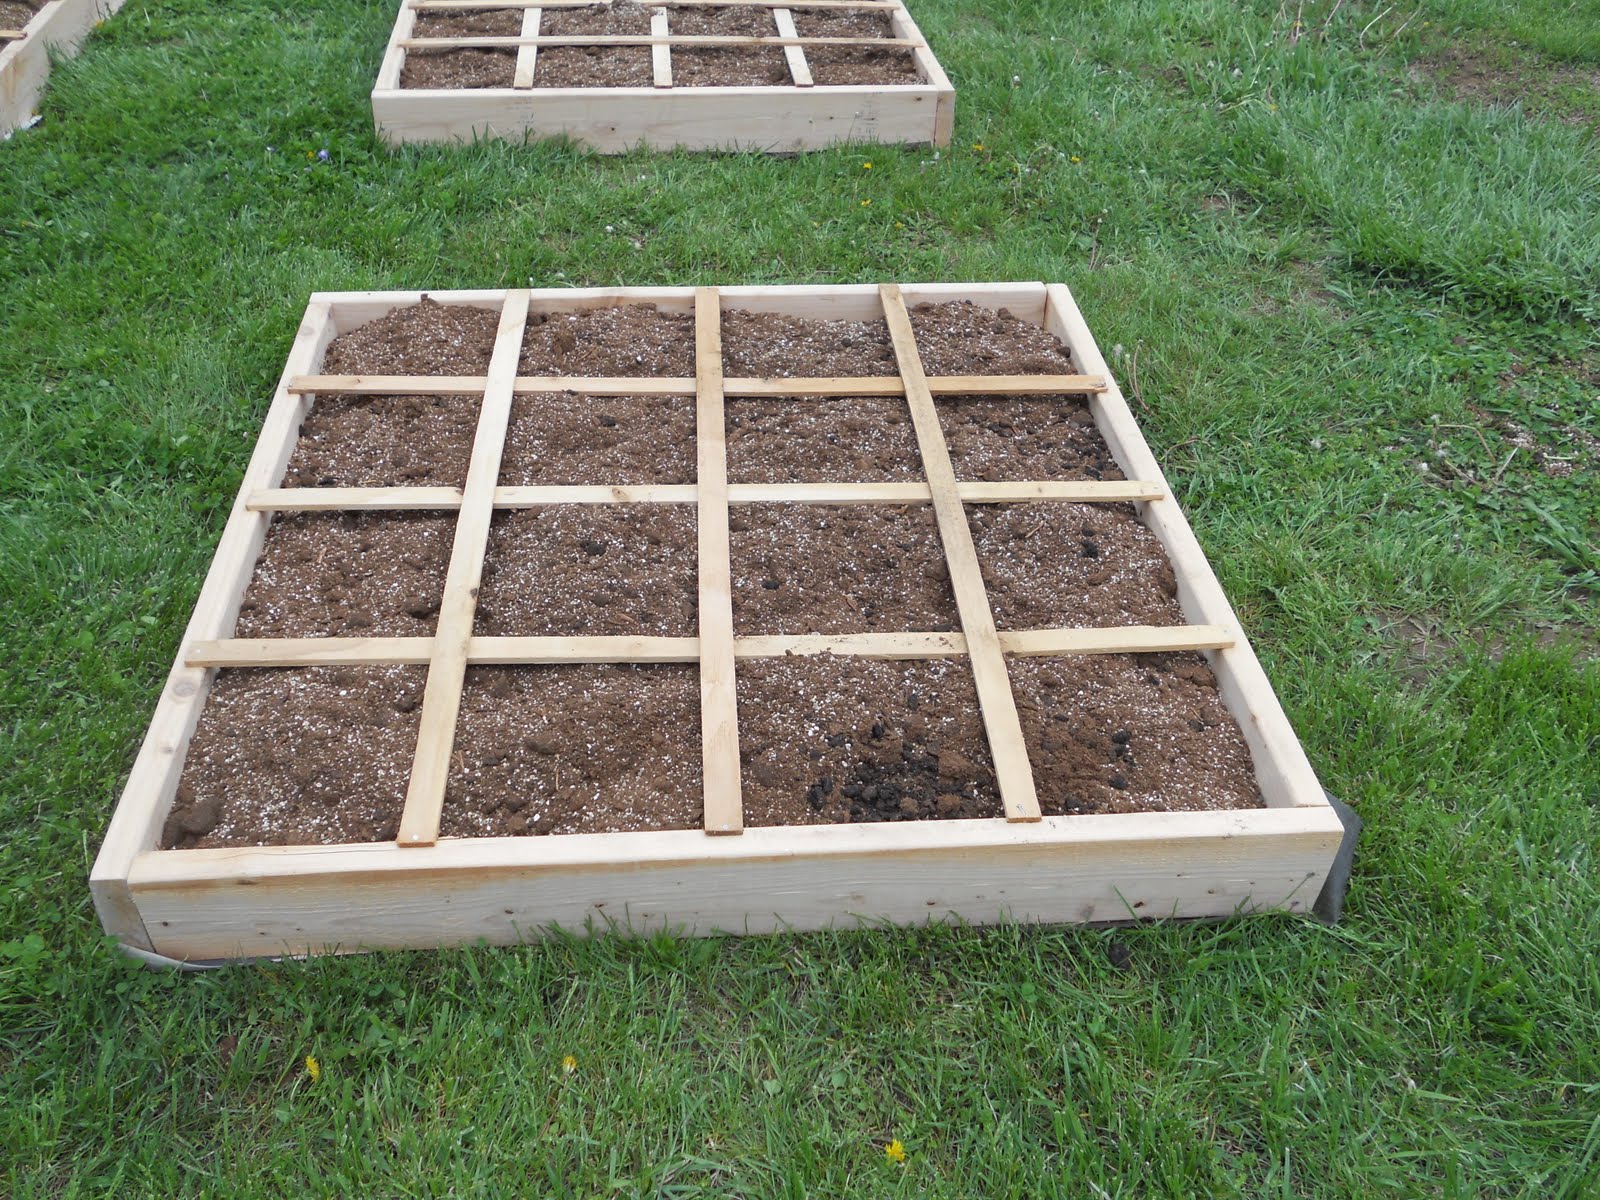
This week DH screwed together some 2X6 pine boards to make my 4 raised Square Foot Garden (SFG) beds. And on Friday I picked up peat moss and compost to fill them. Today I picked up some vermiculite that I had to have special ordered by a local nursery and some free 4 foot wood laths that my uncle gave me. The weather ended up being pretty decent so this afternoon I spent about 3 1/2 hours putting together my SFG beds. The beauty of the SFG method is that now that the beds are done I will have very little prep work each spring from now on. No tilling or prepping the soil.......all I'll need to do is mix in a little compost each time I'm ready to plant. Such an awesome method.


Here is what the back of my van looked like at 1:00 p.m. when I started the project. It took me about 30 minutes (and some muscle power) just to haul everything to the backyard. DH would have helped but he is out of town this weekend.


Once everything was moved to the backyard it was time to make my "Mel's mix". This is a mixture of roughly 1/3 peat moss, 1/3 compost, and 1/3 vermiculite. It is the combination recommended by Mel Bartholomew, the creator of the SFG gardening method. The great thing about starting with Mel's mix is that you don't need to worry about the condition of your soil.....you don't use your soil. Also, the combination is specially designed to hold just the right amount of water to make your plants grow really well. With this combination it is impossible to overwater your plants. If you want to know more, head over to Mel's website or check out his book from your local library. I have it checked out right now for the second time.


Here are my beds waiting to be filled with Mel's mix.


To mix the Mel's mix I got a big tarp and poured out all the ingredients on top. In the book Mel recommends starting with the compost, then adding the peat moss, then the vermiculite. The main reason he recommends this is because he strongly suggests finding several different types of compost and mixing them together first. I could only find a bagged mixture of humus (plant matter) and manure so I didn't need to mix compost. After mixing everything up this afternoon I have a few suggestions if you are going to try to do this yourself. First........if you are mixing material to fill several beds, only mix the amount needed for one bed at a time. I started by mixing about half of my whole batch (which means half of 12 bags of compost, 5 bales of peat moss and 2 HUGE bags of vermiculite) the first time and this ended up being pretty difficult to mix well. It was just too heavy. After that I only mixed one "bed's" worth at a time and that was much easier. Second, if you don't have to mix different types of compost I found it easiest to pour out the peat moss first, then mix the vermiculite into that. I ended up mixing these with my hands because it felt so good and worked better than doing it any other way. I was literally up to my elbows in mix. My sons helped with this part. It was fun to get so dirty. If you have another adult helping you Mel recommends folding the tarp and mixing it that way. I only had an 8 year old and a 4 year old so we used hands. After mixing the peat and vermiculite, add the compost. It tends to be the most damp and heavy so it was much better to mix it in last.


Here is what the mixture looks like before being mixed together.


And here is what it looked like after.


I lined the bottom of the bed with some landscape cloth I found in my garage and several layers of newspapers since I didn't have enough cloth to cover all the beds. Hopefully the newspaper will be enough to deter weed growth. A major reason I am doing this method is because I HATE weeding. As Mel says in the book, there is little to no weeding with this method. Because you are not using soil there are no weed seeds in the mixture. Any weeds that do pop up are easily pulled out because the mixture is so loose, unlike your yard which is compacted making it difficult to pull out weeds.


My big boy took a photo of me spreading out the mix in one of the beds. In the background you can see the corner of our chicken yard, one side of our boys' fort, and our two compost piles (in the white circular "fence".


It was a good feeling to get all the beds filled without getting rained on. It was cloudy all afternoon and at one point it seemed like it would rain, but it didn't.


The final step was to nail pieces of wood lath into a grid shape on top of each bed. Mel insists that without the grid you don't have a square foot garden. He says it is important to add the grid so you can truly see where you need to plant everything. In theory, each square foot could have a different vegetable or flower in it.


It feels good to have these done. Hopefully I will have enough energy to start planting tomorrow. I am really tired tonight!


Tuesday, April 13, 2010

What I've been up to

I realize I have been MIA for a while. We went on a family vacation over Easter......lots of fun. Since we've been back life has been busy, as usual. Also as usual I have become obsessed with a new idea for spending more quality time together as a family. I am hoping to start a new family tradition of camping together. We have not yet ever tried camping as a family. DH and I camped on our honeymoon (one night if I remember correctly) and also camped a little early in our marriage. We own one tent.........a teeny little pup tent that fits a queen size air mattress and nothing else. You can't even stand up in it. So.......if we are going to dive into family camping we will obviously need to invest in a family-sized tent. Since I love doing internet research I have spent NUMEROUS hours online over the past several nights after the boys are in bed looking at tents, reading tent reviews, searching for family camping blogs, etc. I can be very one-track-minded about things sometimes. It is a little over the top. I was like that last summer when we decided to get chickens. I immersed myself in "chicken research" for many weeks.

I am hoping that our family will enjoy camping together. I really want my boys to grow up loving and respecting the natural world. It is SO sad that children these days spend so little time playing outside. My favorite childhood memories are almost exclusively tied to times I spent outdoors either on my own or with my family. We did a little camping when I was a child. Although we didn't do it really often.........and sometimes it was just in our own backyard........I do have good memories of it.

For a while I was really hoping that we could get a pop-up camper to use for family camping. In fact, last summer we were VERY close to purchasing a used pop-up camper but we decided to not go through with it. We were afraid that we wouldn't actually end up using it and that it would be a waste of our financial resources. The truth is......we don't have an extra $5000+ this year to buy a used pop-up camper. So...........tent camping seems to be the best option for us to get our feet wet and see if camping is for us. While doing my extensive research these past few weeks I discovered a concept previously unknown to me called "glamping". Have you heard of this? It is where you combine luxury with camping.........like camping, but with the comforts of home. Here is a great article about glamping if you want to read more. The crafter in me really digs the idea of special camping "bedding" with coordinated table linens, etc. I am already dreaming of the cute color-coordinated camping accessories I could sew for us. (I realize this borders on insanity.......no need to point that out. I'm aware.) But............I truly do see some camp-related sewing on the horizon if we end up getting a tent and moving forward.

In case you are interested, the tent I am pretty sure is my true heart's desire is the Eureka Copper Canyon 1312. Below is a photo of it courtesy of Amazon. And HERE is the Amazon link. I have truly read dozens of reviews of dozens of tents and I think this is the one. DH............if you are reading this, pretty please can we buy this tent? It is WAY WAY WAY cheaper than a pop-up and we could use it for years to come. Just think about it, 'kay? You know Mother's Day is coming up soon!

Here are some features I love about this particular tent. First of all, the size is great. It is 13 feet by 12 feet which makes it the size of a good-sized bedroom. It's important to me that the tent is spacious enough for use to put air mattresses and cots for sleeping. Gotta have comfort. I also love that this tent is tall enough to stand up in without bumping your head on the top. Since it is a cabin-style tent the walls are pretty vertical so there should be no need to bend down to get to any part of the tent. Another great feature is a sweep-out doorway so you can easily sweep out any grass that accumulates inside. In most tents there is a "lip" at the doorway which makes it quite difficult to clean out. Most of the reviews I've read say that this tent is easy to set up. Finally, the Eureka brand is a really good brand name with a great reputation. If we are investing a big chunk of change in a tent I want it to be one that won't have to be replaced for years to come. Maybe our grandkids will someday go camping with us in this tent. If any of you out there have tent-camping experience, I'd love to hear from you. What kind of tent do you have? Any good tips for camping with kids?


Monday, March 29, 2010

"Gear"ing up for a trip

We are taking a trip very soon that involves air travel. For quite some time I have wanted to sew the boys some new "gear" to take with them. Of course I waited until this weekend to get started. I am pretty happy with how these turned out. I made each boy a drawstring backpack using THIS TUTORIAL from Martha Stewart. These backpacks were SO easy to make. I am pretty sure I made them from start to finish.......both of them........in under an hour. They will be awesome to take on hikes, etc. this summer. I used a contrasting cotton print fabric for the inside instead of nylon recommended in the link. Also........I bought the fabric at Hobby Lobby and they didn't have drawstring cord. So I used really narrow double-fold bias tape. I just had to stitch it together first using a straight seam down the middle. This worked okay but if you have access to cord that would be easier and would eliminate a step. I used Wonder-Under to iron a monogram on each pack.


And I made each boy a drawing pad/crayon holder to match their new backpacks. They both like to draw and write so I knew these would be great for taking on the plane. To make these I used THIS TUTORIAL from Skip to My Lou. I had to adjust it somewhat to make it shorter from top to bottom so it would better fit the drawing pads I bought at Target.


When opened they look like this. I put Crayola Twistable crayons in the pockets. You could also put colored pencils.


Sunday, March 28, 2010

I love you, Goodwill

Today I headed to Goodwill to scout out some new clothes for spring. We are going on a little vacation later this week and I wanted to see if I could find any great deals. Boy, did I! I really need to go to Goodwill more often. I bought 9 pieces of clothing for myself for just over $30. I decided to dedicate this blog post to showing you what I bought. Perhaps it will inspire you to consider thrifting for clothing for yourself. It takes time and patience to score good deals at Goodwill. Don't be discouraged if you come away with nothing. Go back again. Sometimes I find nothing to bring home and sometimes (like today) I find a bunch of great stuff. Below you can see many of my new clothing items hanging in my bathroom.


I was absolutely thrilled to find a brand new (tags still on) MUDD coat for $5.49. It is tan-colored "suede" with a fleecy lining. A perfect transition coat and I really needed one. I also found a cute white cardigan sweater with tags still on for $5.49.


One great thing about Goodwill is that they always have some of their clothing on sale for 99 cents. Today it was green-tagged clothing. I bought this royal blue Starter running shirt for 99 cents.


A pair of shorts and a paisley knit blouse (I LOVE it!) for $3.49 each (I think).


I debated about the flowered top on the left. It has a matching cami with it. They are made from kind of a crepe material. I was a little afraid they look "little old lady", but I know that the trend this season is florals. I felt much better when I saw something VERY similar at Target today. I think I can pull it off........and for $3.49 you can't beat the price. The green knit polka dot shirt was also $3.49.


This blouse was 99 cents and will be great to wear to work.


This olive green knit top is a really flattering fit on me, I discovered. I wished they had it in many different colors, but that usually doesn't happen at Goodwill. When I got home I found a hole in it, but it was in the seam and I quickly stitched it closed on my sewing machine (which was already up and running since I was up late..........1 AM.......working on a project last night. I'll reveal the project soon!). Good as new! And it was $3.49 (I think).


OK..............admit it! You're totally impressed with my thrifting bounty. Now get out there and run (don't walk!) to your nearest Goodwill. Drop me a line and let me know what great things you find, 'kay?

Monday, March 22, 2010

HopAlong is doing well :-)

I wanted to post a quick update to my last (gruesome) post. Sarah is doing really well with only 1 leg. We kept her inside the first night, then put her back out with the flock the next day. We tried to change her bandage this weekend but it quickly fell off so we are leaving it uncovered. Her stump looks like it is healing nicely. She is quickly adapting to her new condition. In fact, yesterday when I went outside to get a photo of her I took a ripe banana with me. I tossed several chunks into the yard for the chickens to eat. They LOVE bananas. Sarah, on a single leg, totally beat Arthur the rooster to a chunk of banana and ran off with it before he had a clue what was going on. This is very impressive since she has only one leg and is less than half the size of him. I was really happy for her, especially since she still has to fend off his "romantic" advances on only one leg. There is a lot of truth to the saying, "Like a rooster in a henhouse." You can see from the picture below that she is looking healthy and happy. I am SO glad.


Wednesday, March 17, 2010

Bloody Stump

Some other titles that were considered for this post include: "Missing: One chicken foot" or "Where the heck is Sarah's dead foot?" or "Guess what I discovered in the henhouse today?" Instead, I settled for what you see above. Yes, "bloody stump" pretty much sums it up nicely with no sugar coating or beating around the bush.

DH told me when I got home today that he thought Sarah (the chicken with the dead foot) wasn't doing very well. We have been free-ranging our chickens a little each afternoon and today when he let them out Sarah didn't want to leave the coop. Instead, she was huddled next to the nest box. When I went out to check on her I picked her up to see how her sore foot was doing. You can, perhaps, imagine the alarm and shock that I felt when I saw a bloody stump where her foot had been. And no foot in the near vicinity. It was a truly gruesome discovery. I immediately headed inside to enlist the help of my DH. I was a teeny bit panicked if you want to know the truth. My husband was more diplomatic and calm about it. He reminded me that we actually had HOPED her foot would fall off on its own. We discussed it further while waiting for the vet to call us back. I heavily insisted that my husband go out to examine the stump for himself. Truthfully, I didn't want to look at it. Long story short, DH talked to the vet (who happens to be a friend of ours who goes to our church) and we brought Sarah inside (again) for the night, put Neosporin on her stump (DH did that while I held her; he's nice like that), and wrapped the stump in a piece of gauze and taped it up. She is currently resting in the Rubbermaid tub (AKA "chicken hospital") in our bathroom. Hopefully she will fully recover and be a cute and friendly "disabled" chicken. A few people who have learned about her situation, knowing my crafty nature, have suggested I design a chicken prosthetic. However, I am pretty sure that is outside the realm of my capabilities. I think Sarah would just peck it off anyway. I'll keep you posted. You can thank me later for the absence of bloody stump photos.

Monday, March 15, 2010

Seeds Family Worship CDs

I recently heard about a great little thing called Seeds Family Worship. I read about it on Angie Smith's blog. As soon as I checked it out I knew I wanted to order a CD for our family to enjoy. I picked The Power of Encouragement, their newest CD. Each CD contains scriptures set to music. The best part is that the songs are really fun, contemporary and catchy. I love listening to this in the van. Each CD comes with an extra tear-off CD to share with a friend. I gave my extra one to our MOPS group to use as a door prize at our meeting last week. You should head over and check out this ministry. It is really awesome!

I took my boys to a forest for a hike yesterday and we listened to this all the way there and back in the van. It was just what I needed. My mind had been focused on something that happened this weekend and I was not thinking very positively. The Scriptures featured on this CD were perfect for helping me gain a right perspective on things. I have so much to be thankful for.......and it never hurts to be reminded of that.